Create A Mouthwatering Chocolate Covered Strawberry
Tutorials | February 11th, 2010
It’s almost Valentine’s day and rather than getting your loved one the same old cheap gifts you get every year, why not create a chocolate covered strawberry illustration for them? You can easily apply this illustration to your own greeting card, t-shirt, or anything else you can think of. Moreover, you can apply this tutorial to other illustrations and logos.
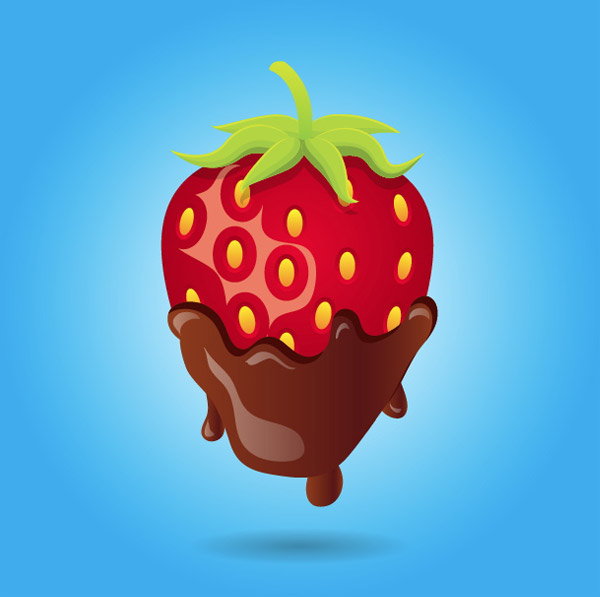
Final Image
Below is the final image we will working towards.
Tutorial Detail
- Program: Adobe Illustrator CS4
- Difficulty: Intermediate
- Topics Covered: Ellipse tool, Pencil tool, Pathfinder panel, Gradient panel, Custom Art Brush
- Estimated Completion Time: 20-30 minutes
Step 1
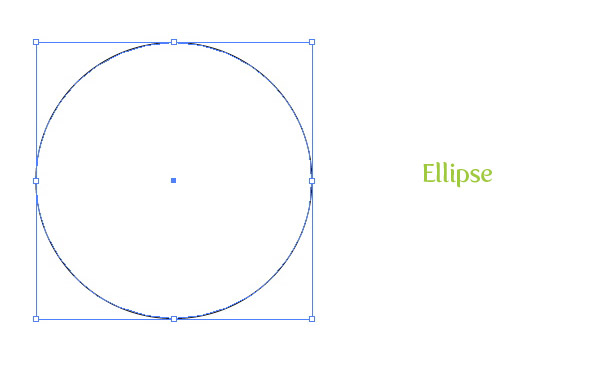
Create a new document and create an ellipse with the Ellipse tool (L).
Step 2
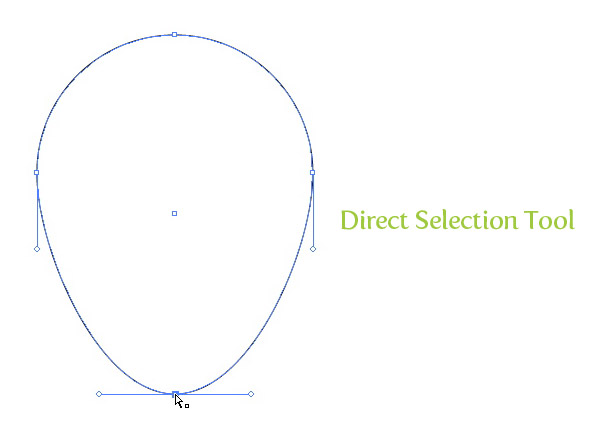
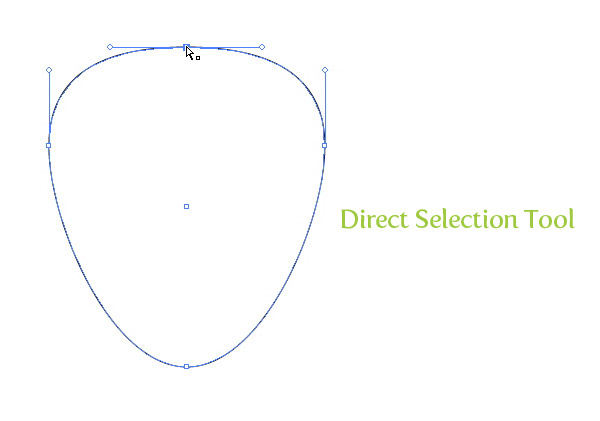
With the Direct Selection tool (A), grab the bottom anchor point, hold down the Shift key (to constrain the movements), and drag it down about one quarter of the original size of the ellipse.
Step 3
With the Direct Selection tool (A), grab the top anchor point, hold down the Shift key, and drag it down about one eight the original size of the ellipse.
Step 4
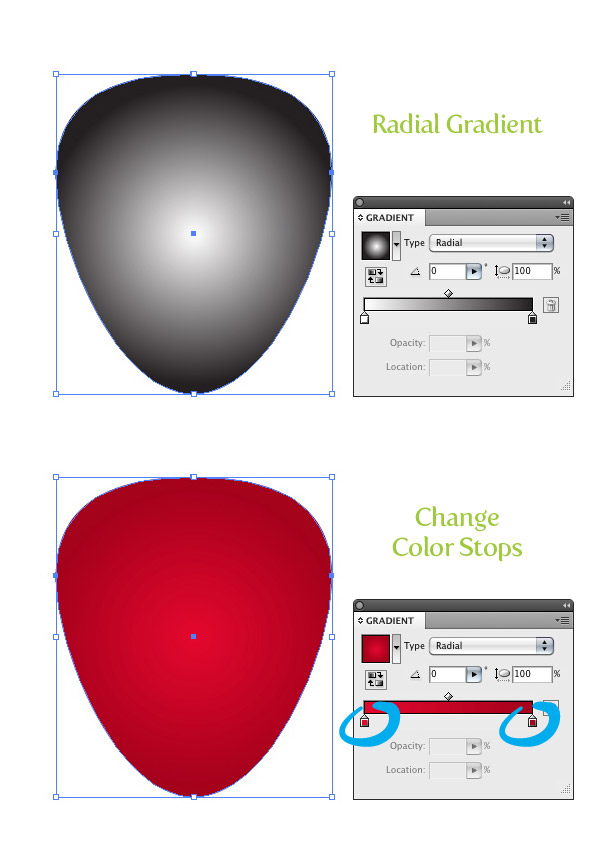
Fill the new shape with a radial gradient from the Gradient panel. Change the first color stop in the gradient to red and the second color stop to a darker red.
Step 5
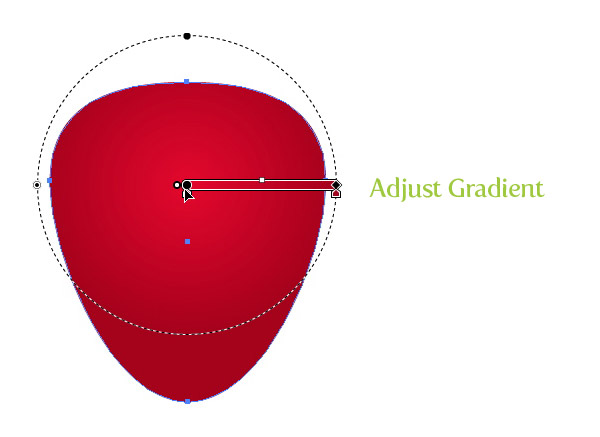
With the Gradient tool (G) adjust the radial gradient so the lightest part of the gradient is at the top of the shape.
Step 6
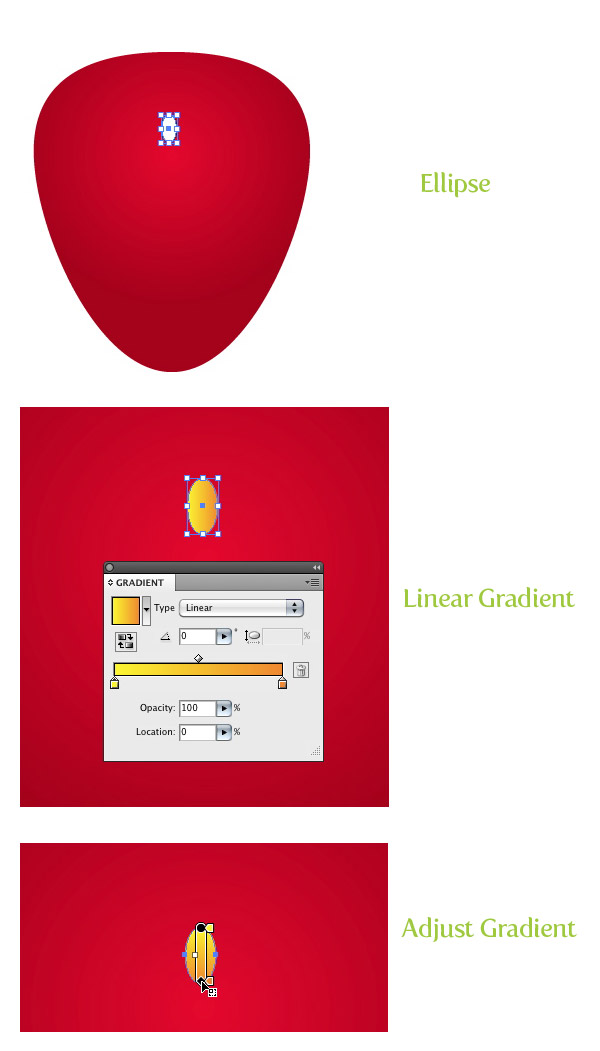
Create a small elongated ellipse toward to top center of the berry shape. Fill the ellipse with a linear gradient with the first color stop a light orange and the second color stop orange. Adjust the gradient with the Gradient tool (G) so the lightest part of the gradient is at the top of the ellipse.
Step 7
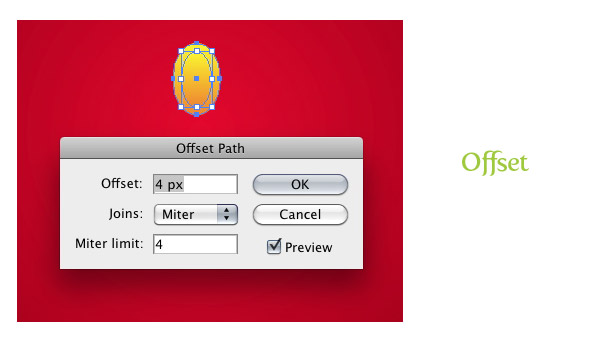
With the small ellipse selected, go Object > Path > Offset. Once the Offset dialog is open, change the Offset to 4 px. This measurement might be different depending on the dimensions of you artwork.
Step 8
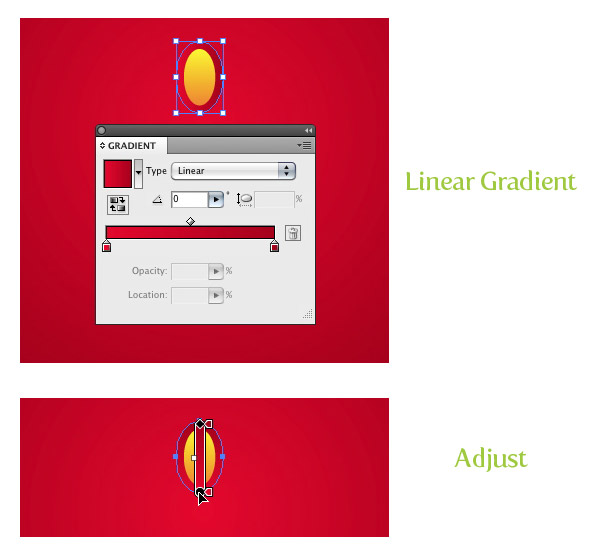
Fill the offset ellipse with a linear gradient with the same reds as the main berry shape. Adjust the gradient so the darker part of the gradient is at the top of the shape.
Step 9
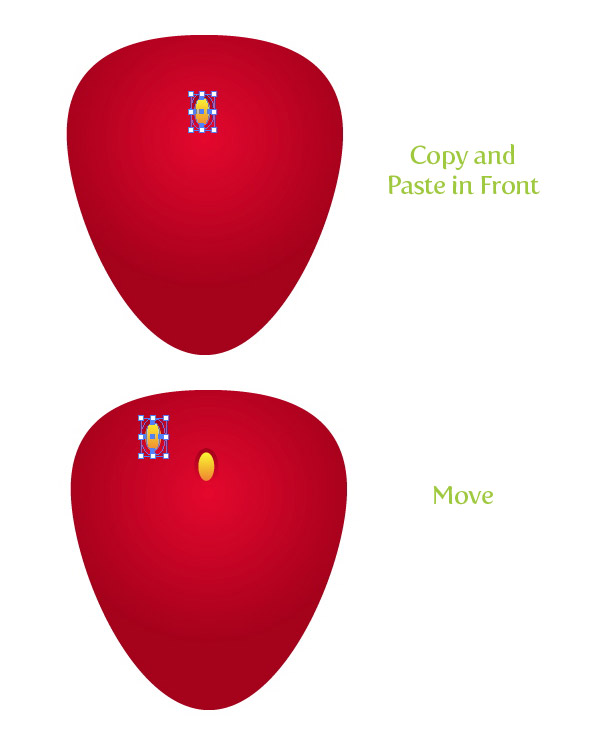
Select both shapes, Copy (Command + C), and Paste in Front (Command + F). With the copy still selected, move it above and to the left of the original ellipse shapes.
Step 10
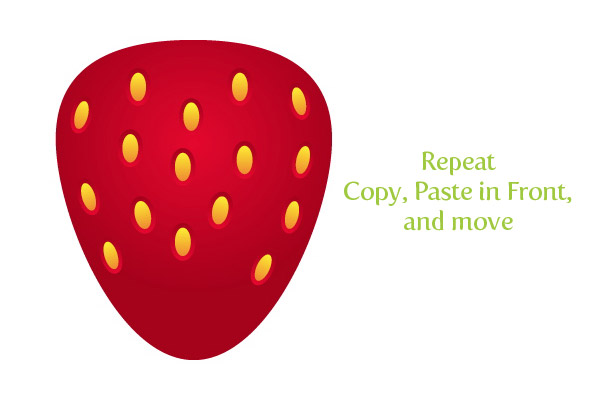
Repeat the previous steps placing copies of the small ellipses around the berry shape. When you are placing shapes close to the edge, rotate them with the Selection tool (V) to follow the curvature of the berry.
Step 11
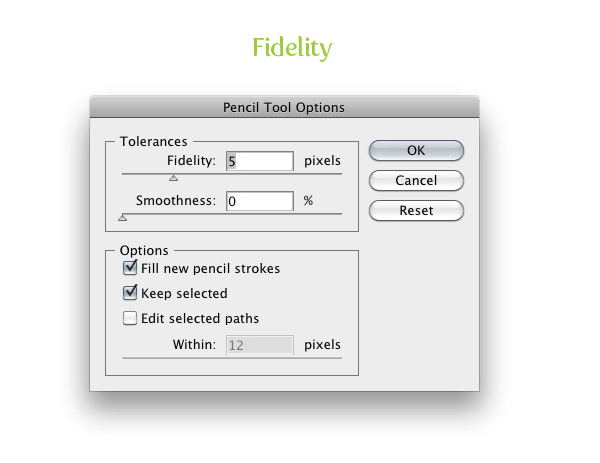
For this next step we are going to use the Pencil tool (N) because it is a quick way to draw paths. Before we start drawing with the Pencil tool (N), it is a good idea to set some tool preferences so we can get a smooth line while drawing. First, double-click on the Pencil tool (N) in the Tools panel to bring up the Pencil Tool Options. The option that we are most concerned about is the Fidelity. I like to set mine at 5 pixels to ensure a smooth line. You can always play around with these settings if you don’t like the line path quality in the next step.
Step 12
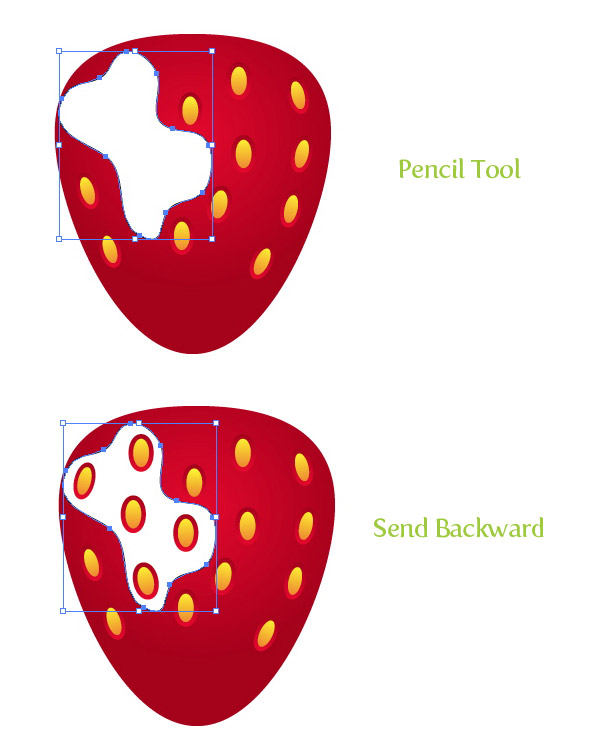
Now that our Pencil tool (N) is set. start drawing a shape around four or five of the smaller ellipses. Hold down the Alt / Option key when you are almost done to connect the beginning and end points. With the new shape selected, go Object > Arrange > Send Backward (Command + ]) until the shape is behind all the small ellipses.
Step 13
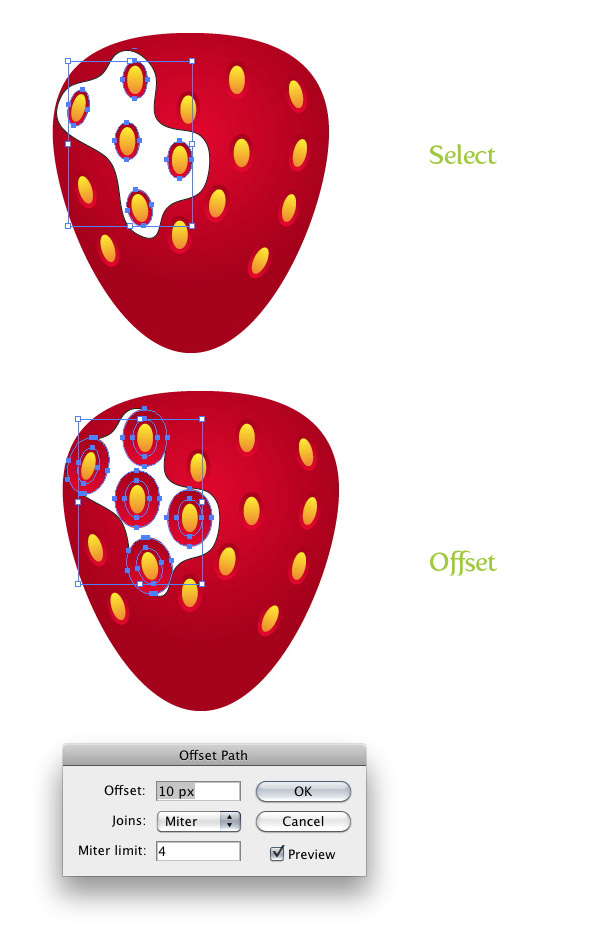
Select all the small red-gradient ellipses encompassed by the pencil shape, go Object > Path > Offset, and change the Offset to 10 px.
Step 14
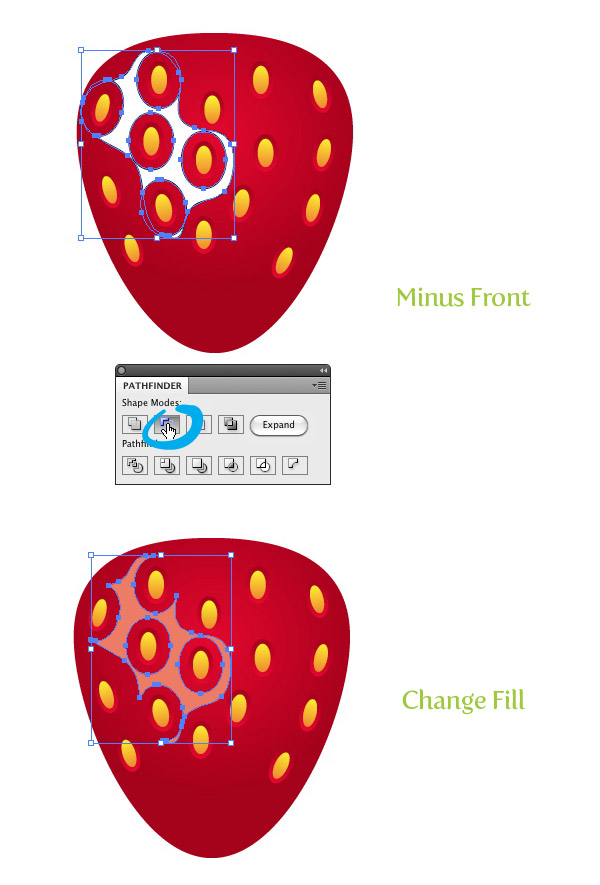
With the new offset ellipses still selected, hold shift, and select the pencil shape. From the pathfinder panel hold down Alt / Option and press the Minus Front button. Next, change the fill of the new shape to a light red color.
Step 15
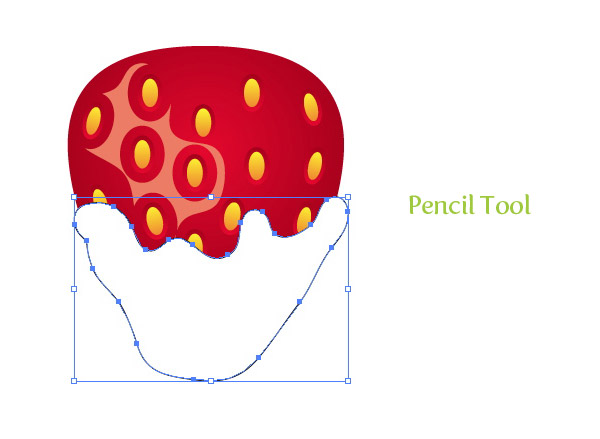
With the Pencil tool (N) draw a organic shape encompassing the bottom half of the berry.
Step 16
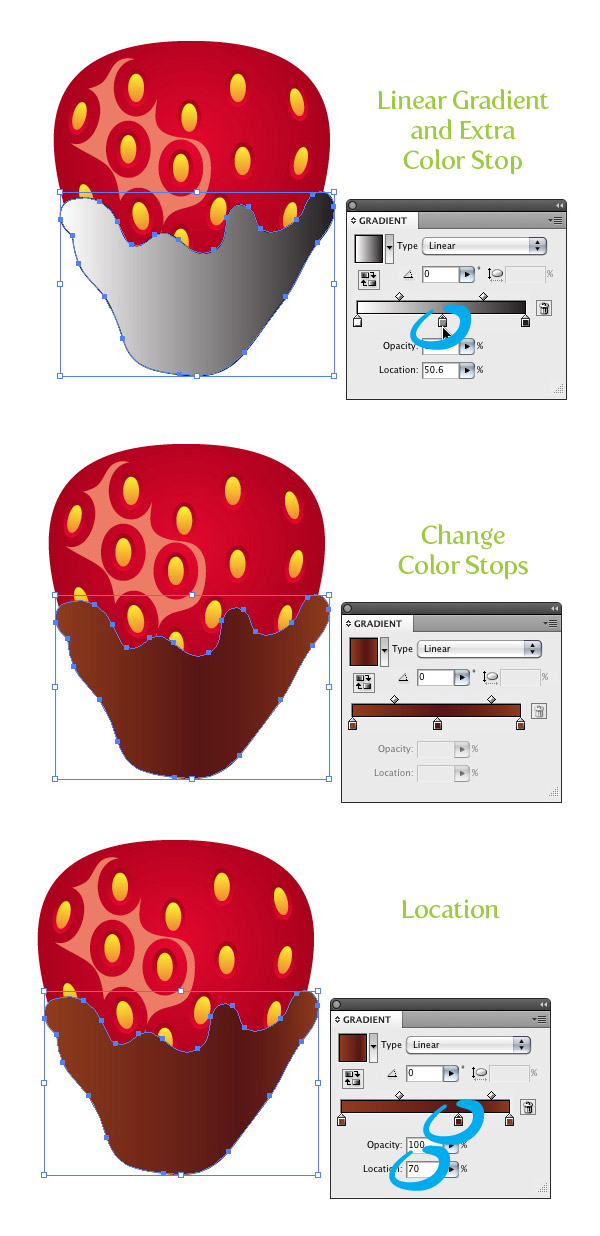
Fill the new shape with a linear gradient. For this gradient we need to add an extra color stop. To do this, simply click on the middle of the Gradient Slider in the Gradient panel. Change the first color stop to light brown, the second to a dark brown, and the third to your first light brown. Next, select the middle color stop and change the Location to 70 in the Gradient panel.
Step 17
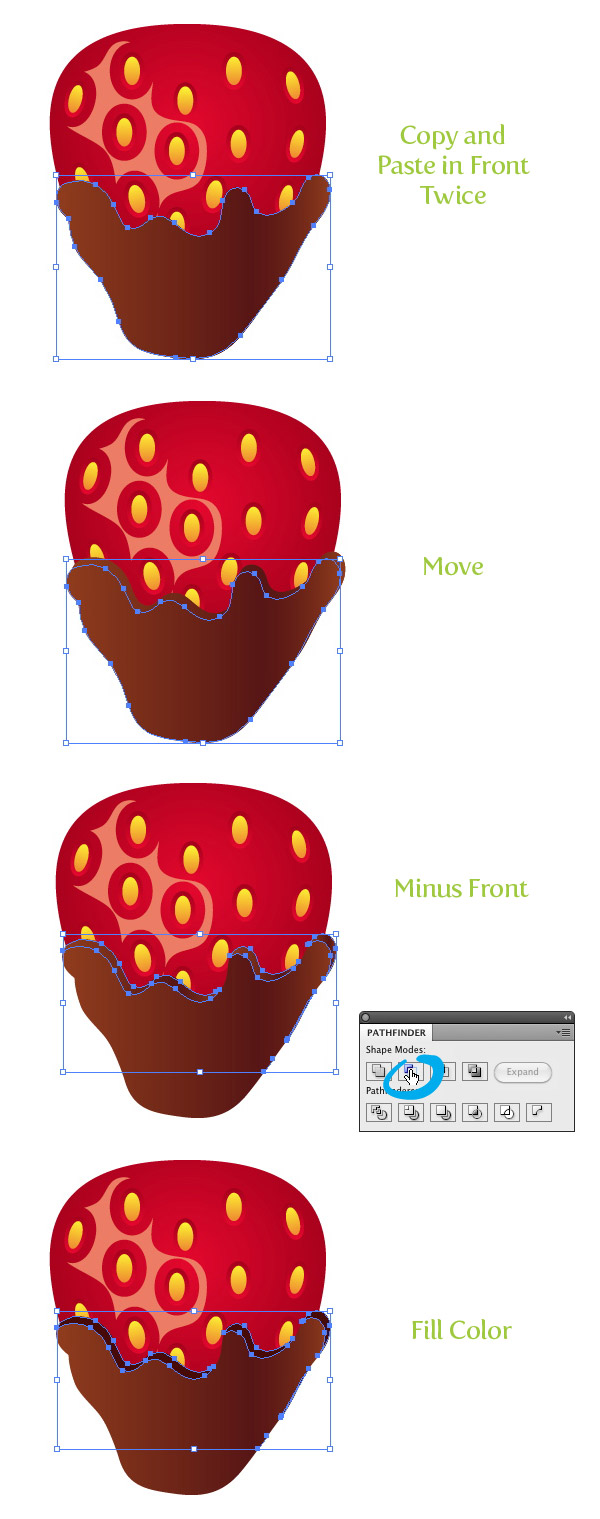
Select the chocolate shape and Copy (Command + C) and Paste in Front (Command + F). Do this one more time so you have three total shapes. Select the top copy and move it down and to the left slightly. Next, select the moved copy and the one underneath it and press the Minus Front button from the Pathfinder panel. Change the color of the new shape to a dark brown color.
Step 18
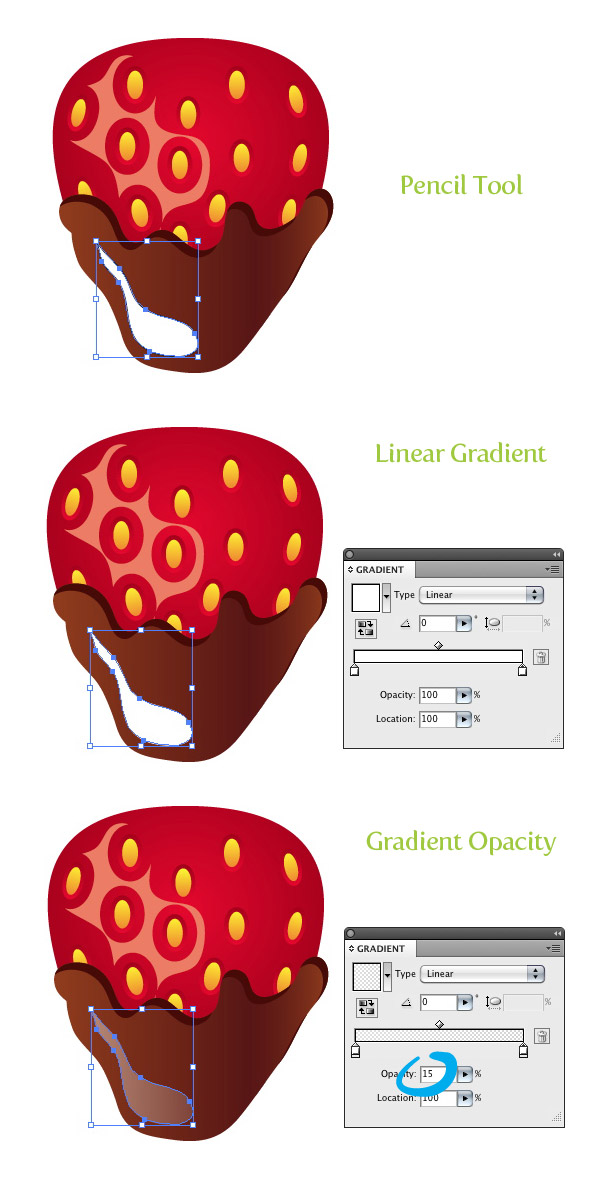
With the Pencil tool (N) draw a new highlight shape towards the bottom of the main chocolate shape. Fill the new shape with a linear gradient and make both color stops white. Change the opacity of the first color stop to 40 and the second color stop’s opacity to 15 from the Gradient panel.
Step 19
Create a couple more highlights around the top left curves of the main chocolate shape. Fill each new shape with the same white gradient as in the previous step.
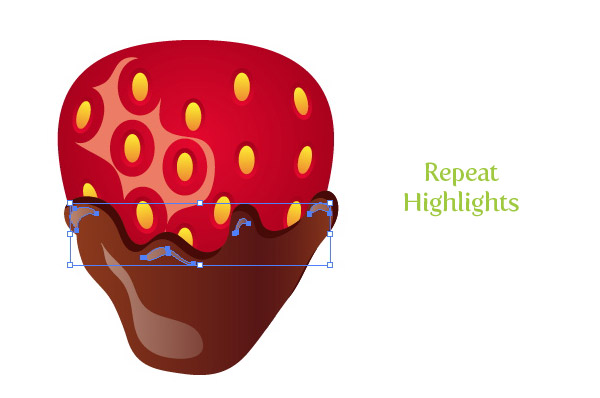
Step 20
Create a couple more chocolate drops with the Pencil tool (N) and apply the same gradients as in the previous couple steps.
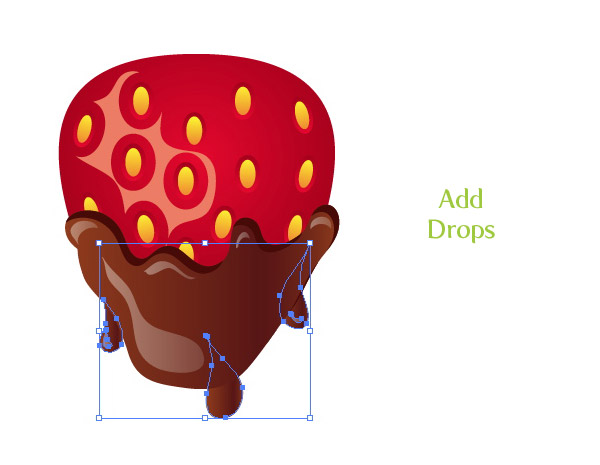
Step 21
Now we can move onto the leaves and stem of the strawberry. For the leaves we are going to create an custom Art Brush, making it easy and quick to create the leaves. To start, create an ellipse with the Ellipse tool (L).
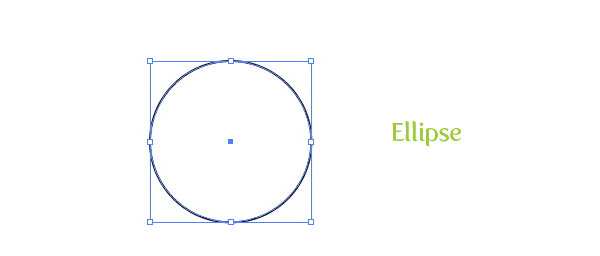
Step 22
With the Direct Selction tool (A) grab the right anchor point of the ellipse and drag it right to about double the original width. With the point still selected, press the Convert to Corner button from the Control panel. Next, fill the shape with a green color.
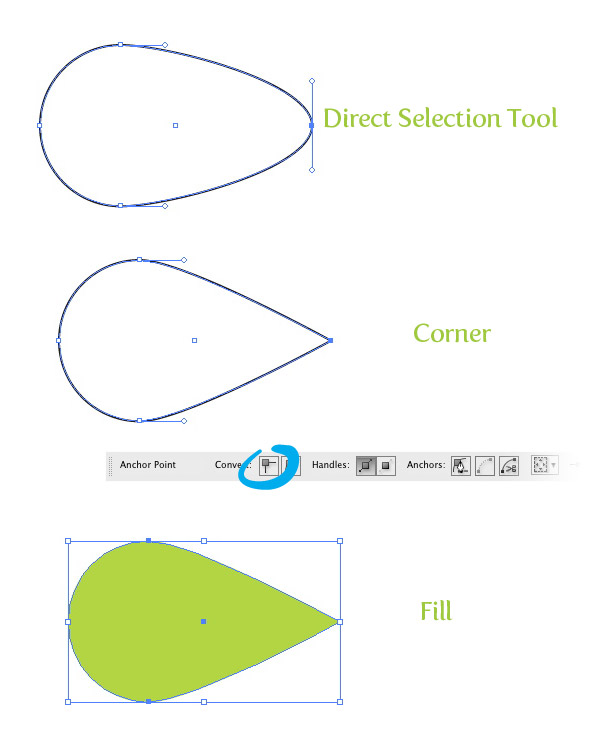
Step 23
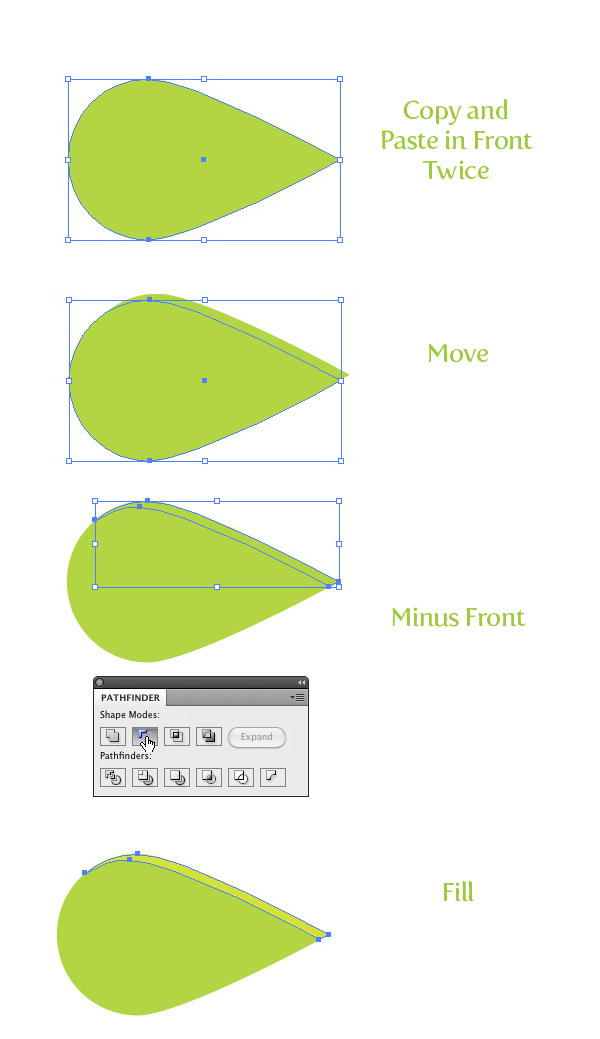
Copy (Command + C) and Paste in Front (Command + F) the ellipse shape twice. Select the top copy and move it down and to the left slightly. Select the two top copies and press the Minus Front button from the Pathfinder panel. Next, fill the shape with a light green color.
Step 24
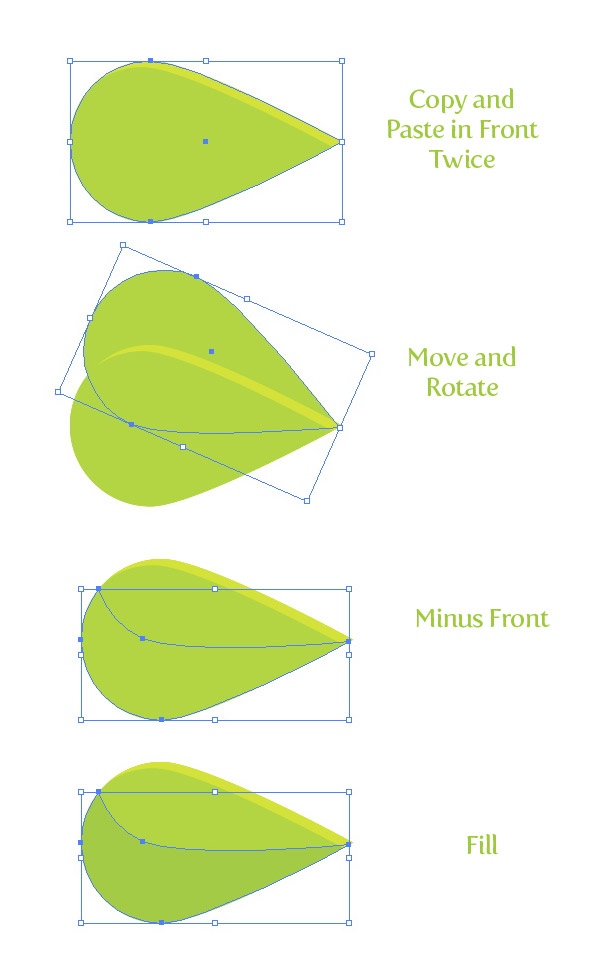
Select the main green shape and (Command + C) and Paste in Front (Command + F) twice. With the Selection tool (V), move the top copy up about half way up the original shape and rotate it so the points of the shape touch. Select both top copies, press the Minus Front button, and change the fill to a dark green color.
Step 25
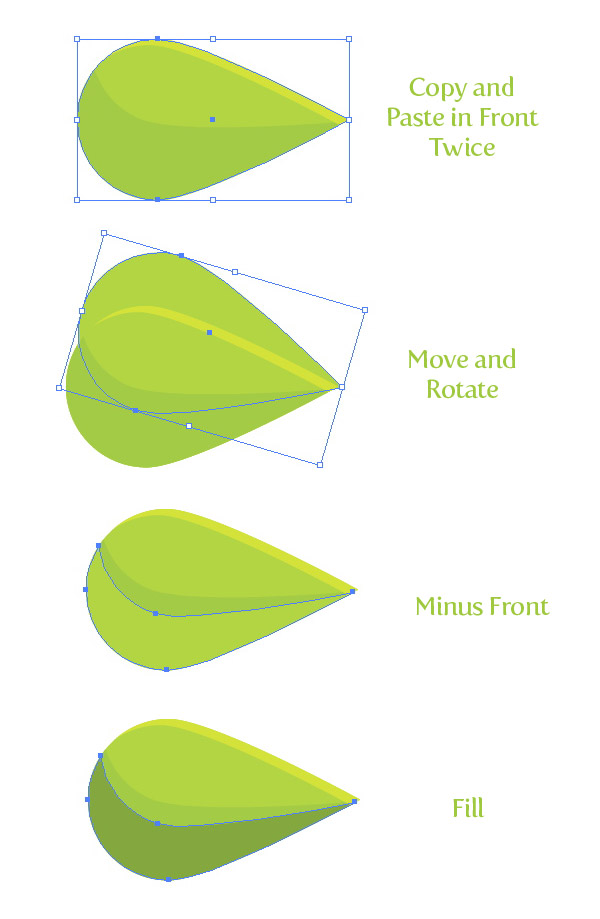
Select the main green shape and (Command + C) and Paste in Front (Command + F) twice. With the Selection tool (V) move the shape up and rotate it slightly, select both top copies, press the Minus Front button, and change the fill to a darker green than the previous step.
Step 26
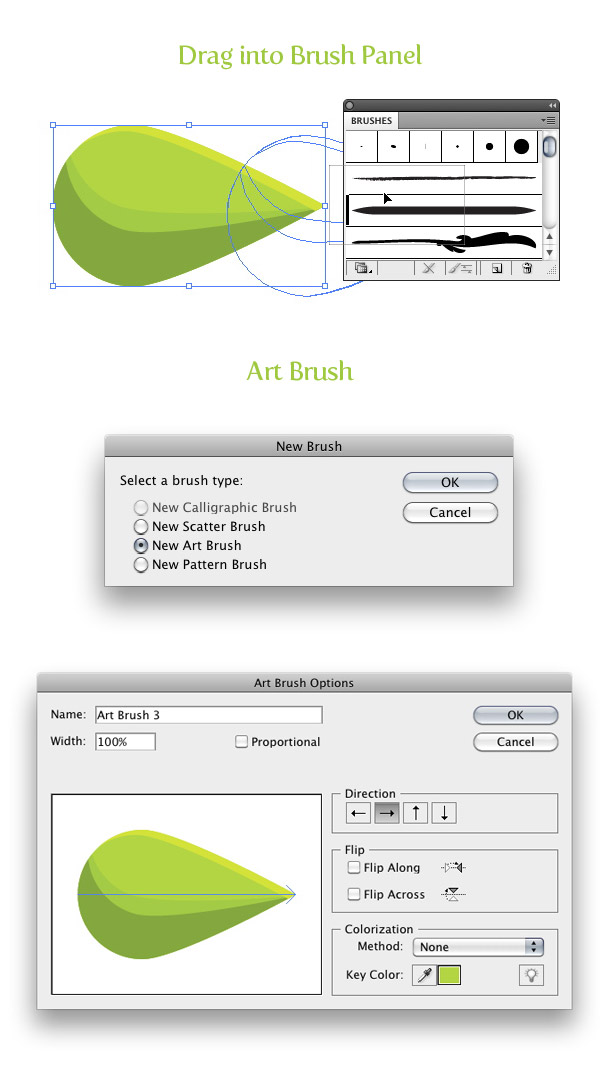
Select all the green shapes and drag them into the Brush panel. When the New Brush dialing opens, select the New Art Brush radial button. In the Art Brush Options keep all the default settings.
Step 27
Use the Brush tool (B) with the new art brush and draw a leaf on the top of the strawberry. You might have to change the stroke of the path if the shape is too big or doesn’t look correct. When creating these brush strokes, make sure the darker part of the brush is facing down and the pointy part of the brush is facing away from the berry shape. If this is not how it looks after creating the path, press the Stroke Options button at the bottom of the Brush panel. When the Stroke Options dialog opens, you can select the Flip Along or Flip Across options until you get the desired arrangement.
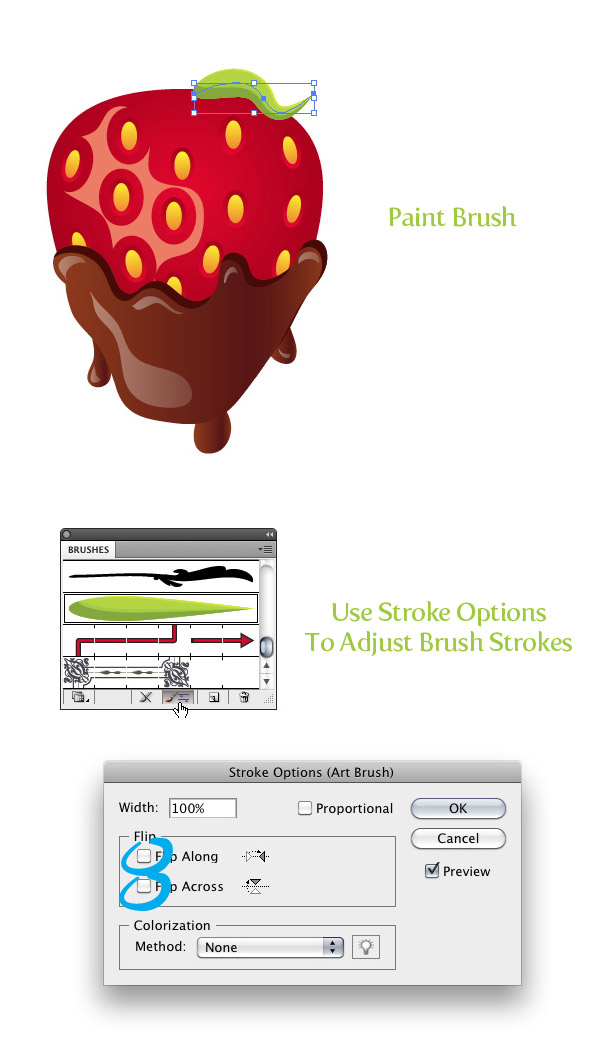
Step 28
Create five to six more brush stroke with the Brush tool (B) and custom brush.
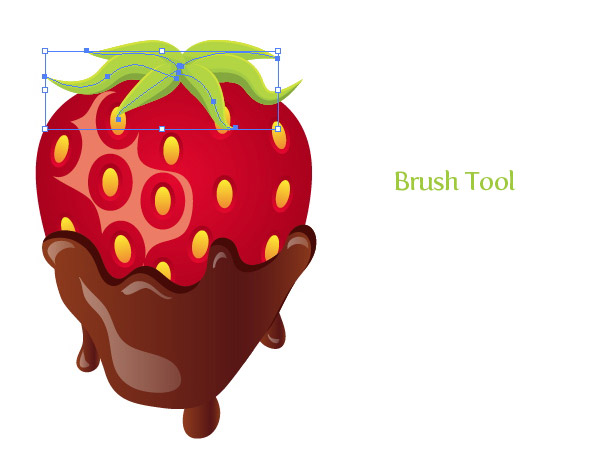
Step 29
Select all the brush strokes, Copy (Command + C) and Paste in Back (Command + B). With the copies still selected, go Object > Expand Apperance. With the expanded brushes still selected, press the Unite button from the Pathfinder panel. Next, move the new shape down slightly.
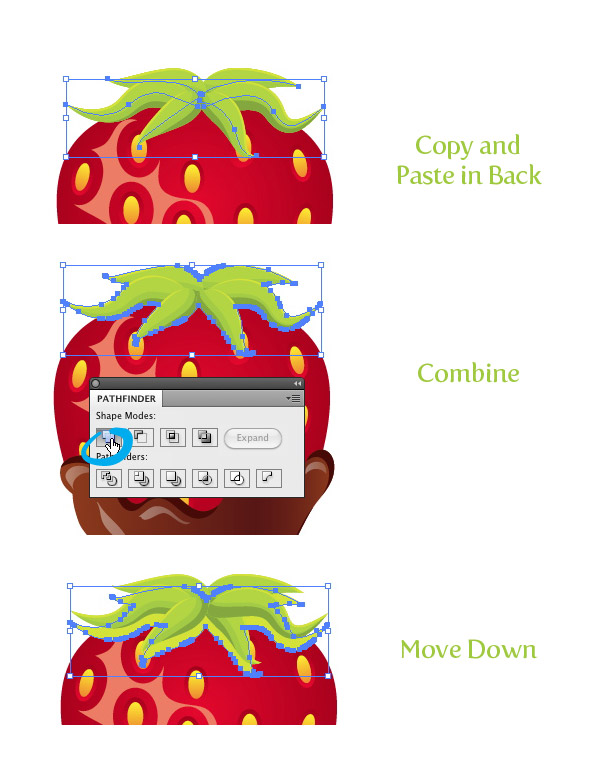
Step 30
Select the main berry shape, Copy (Command + C), and Paste in Front (Command + F). Select the copied berry body shape and combined leaf shapes and press the Intersect button from the Pathfinder panel. Change the fill of the new shape to a grey color and set the Blending Mode to Multiply from the Transparency panel.
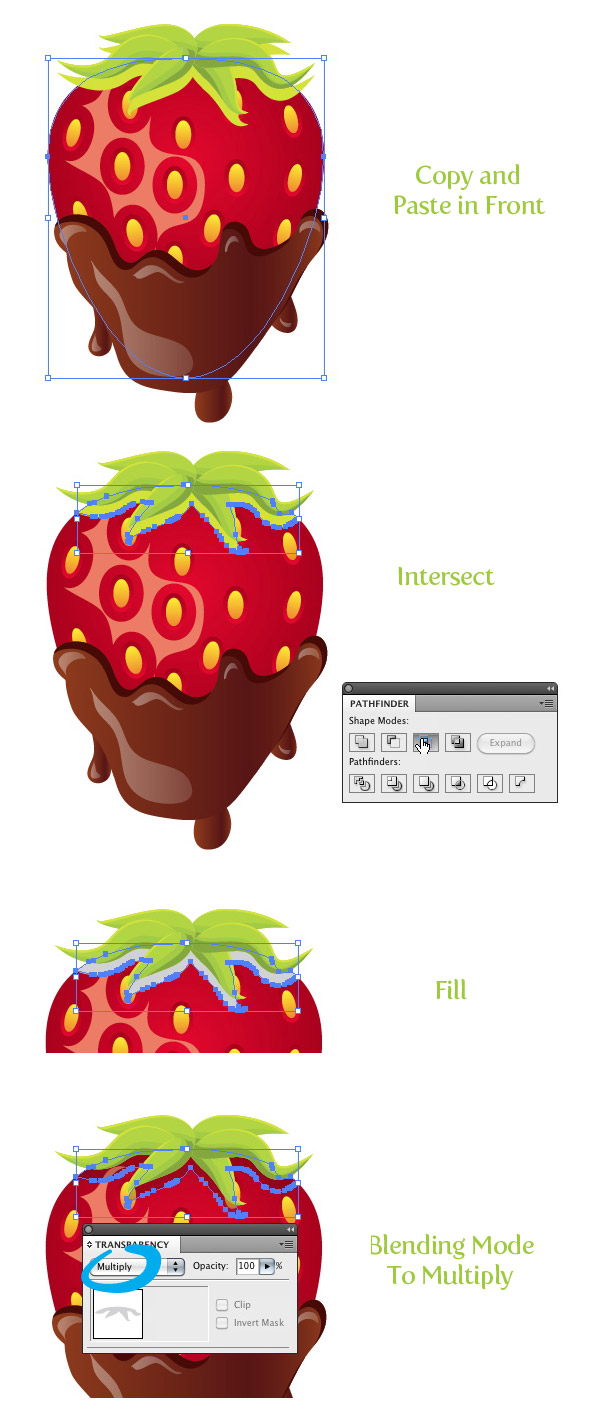
Step 31
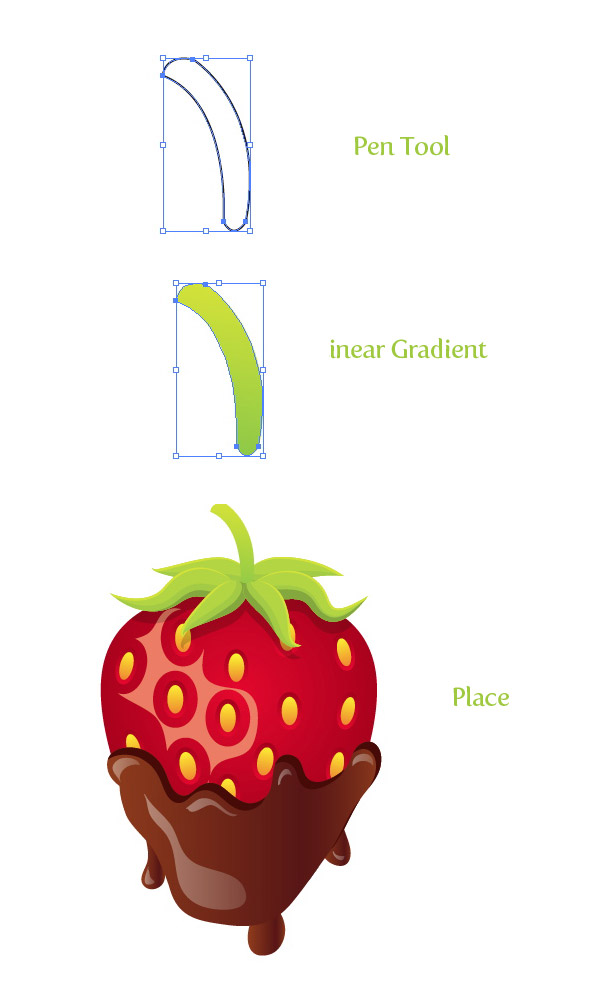
Use the Pen tool (P) to create a stem shape for the strawberry. Fill the shape with a linear gradient with the first color stop green and the second a darker green. With the stem selected, go Object > Arrange > Send Backward (Command + ]) until the bottom part of the stem is hidden from the top leaves. All done!
Final Image
Below is the final image again.





like it ♥
♥
This looks great, especially when scaled down! Good work, thanks
Rype, you always seem to amaze me with your detailed tutorials. Thank you.
Very nice! Outcome looks very cool. Thanks
Very nice and cute example of small scale vectors. i might have to have a play and take this with other dippable items!
That’s brilliant! Sooo good, the final result is brilliant… and great style too! Thanks Ryan!
Ummmm… Slurp. Looks delicious. Thanks a lot for the tutorial. It is really simple and easy to follow. I have fallen in love with Illustrator after seeing so many of your tutorials. They Rock
some nice tips there, shame the final illustration looks a little rushed.
Fun tutorial, great explanation i am going to try this some time just for the tips that are in this
Really nice and fun tutorial. Thank you!
Great tutorial.
Anyway i cant drag them into brush panel. Illustrator says that “the selected artwork contains an element that cannot be used in an art brush”.
I dunno why. I have just 4 objects – paths.
Can anyone help please?
Thank you
Yaku
Ha fixed You cant make them brush if one of the object is wearing a gradient instead of a solid color.
Yay..
Cheers
Yaku
Great tutorial. Very nice to see how one accomplishes the details you created.
Thanks for sharing!
Delicious! Love the tutorial with detail guides. Thank you!
YUMMY!!!…ohh, and bookmarked! definitely going to try this out!!
thanks!
Thanks for the great tutorial. Love when I find tutorials (no matter how difficult or simple) that don’t assume the reader is a master at Illustrator. Very easy to follow along. Love all the use of the Pathfinder tool!
delicious!!
Thank for the tutorial!
Greetings from Poland
thats really so cool! i like it very much, shame i missed it for valentines day. but its a really nice tutorial for me to get stuck into illustrator. many thanks!
So dam tasty Great job here… i must be hungry ;:D
I looks delicious ! I like the chocolate effect …Thanks for the tutorial
nice tutorial thanks
I’ve never really actually considered Illustrator until now, I’m more of a photoshop guy.
I thought I was a dummy at computers but I just finished this tutorial! Thanks for making this tutorial so easy to follow…! I love it!
This is a wonderful tutorial & so cute! I cannot seem to get the leaves to Minus to Front in Step 25. I’ve been working at it for quite some time & it seems to select the top leaf to fill. Any suggestions?
Wow..Its luk great…Its too gud. Thanxxx for the tutorial.
Awesome maaan!
Cool!! I like it!!
the bottom part not look as good as the top but it is very nice tutorial and very detailed.
Very interesting, thanks for sharing
That was so fun to do! thanks
Nicely Done
This is beautiful! Thanks a lot for sharing!
thanks bro very nice
Nice tutorial…………..thanx for sharing
http://www.scrapsforever.com
thanks for tutorial
WoW! I like it. Very nice tutorial.
This is really good, thank you very much for sharing.
Sir, you will give me some illustrator works so i am practice illustrator software.
Thanking You.
Thanks for another awesome tutorial:)
Gosh! I have a thing with strawberries and desperately needed a tutorial on how to create a strawberry to illustrate my strawberry pages. Six months later, while looking for a Valentine related tutorial, I find this one!
Thank you, thank you, thank you!
Hi there,
I’m a beginner in AI and I can’t do effect PATHFINDER > MINUS FRONT. I’m using CS5 and doesn’t appear MINUS FRONT in EFFECTS>PAHFINDER, onlu MINUS BACK. Another doubt I have is when I have an object selected and do pathfinder>some effect it pop ups a message: pathfinder effects should usually be applied to groups, layers or types of objects. This may not have any effect on current selection.
Can you please help me?
Thanks for sharing your knowledge. I’m a newbie of Illustrator and I’m learning a lot from your tutorials
Thank you so much for this excellent tutorial. I am a total beginner trying to learn Illustrator in a large classroom setting at a community college. The instructor is very soft-spoken, goes very fast and will not stop for questions so when I can’t hear her or get lost on one little step I am pretty much lost for the rest of the class. Super-frustrating. I was feeling really discouraged, but this morning l I found and patiently worked through the tutorial steps for the strawberry, and I am already feeling so much better! These are really thorough and helpful and I am going to do all of them. Thanks for not leaving out any little steps that a beginner might not know. Oh my goodness I am so relieved and grateful. Thank you!!!
Loved the tutorial!!! 5 stars to the design. Looks so delicious
nice one, thanks very much
always like to make new brushes, save too much time
Now thats a mouth watering strawberry.
I simple love this tutorial. Thanks for this
Great!! Thank you very much!
Mouthwatering tutorial! Easy to follow and very nice concepts. No wonder that until now, this post receives so many comments.
Nice sharing.thank you very much
Thanks for the tutorial. I was great help in addind to my drawing skills.
hi man it is very cool tutorials thanks man
Thank you for this great tutorial! Ima do this tomorrow for sure and I will learn a lot from it! Thanks a lot for sharing this for free.
Very clear, step by step illustrator tutorial! I have created my own mouth watering strawberry, but cant eat it..
Thank you for the tutorial. It was very clear.
Hey guys, I lover this tutorial, butt I was trying to do it but when it comes to “unite all the leaves” all the leaves deform, can someone help me?
hey guys problems solved thank u, the strawberry looks delicious
This tutorial kicked my butt. I felt like I had a learning disability.
osam it is thanks a ton foe sharing with us
Why can’t I send the object in Step 12 backwards? What’s wrong??
This is a great tutorial, I’m a graphic design student but I really haven’t learned enough about vector art and I have found this to be very helpful in the learning process. Thank you so much, very good tutorial and easy to follow even for me which I am not very experienced yet.